
Within the Oracle SOA Suite, message aggregation is a concept that allows for multiple messages to be routed to the same BPEL process, based on a value(s) defined within the incoming payload. This is implemented within BPEL through the use of correlation sets.
To implement this, a correlation set is defined and will contain one or more properties. These properties have aliases to values within the input payload message (i.e. PurchaseOrderNumber), which are used for the correlation of messages.

Oracle SOA Suite 12c has provided a wizard that allows for easy definition of the correlation set, properties and property aliases which are all necessary for correlation to occur. Below are the steps required to configure your BPEL process to perform message aggregation via correlation set.
Configuration Steps
The first step is to create the Correlation Set. Right click on the initial receive of the process and select ‘Setup Correlation…’

For the initial receive in the process, select the ‘Create Correlation Set’ radio button. In this same screen, select to create the properties for the correlation set (plus icon, as shown below). This creates a row in which the name of the property and type can be changed from the default value to a name and type more appropriate for the solution. At this step, be sure to enter tab after changing the name, to ensure the name gets updated.

In the Initiate Settings, be sure to select ‘yes’ for the Initiate value. This designates that the activity will be the initiator of the correlation:

The properties defined in the first step will now be mapped to the fields within the BPEL process input message, which will be used for the correlation. Each property defined will need to be mapped to an alias (an element in the input payload). There are two ways to do this within the ‘Property Aliases’ step of the wizard. The first way is to select the pencil icon, which brings up the property alias editor. From there, select the field(s) to map to.

The second method is by using the Drag and Drop editor (icon next to pencil):

Once this editor is opened, select the field from the process variable into the property alias:

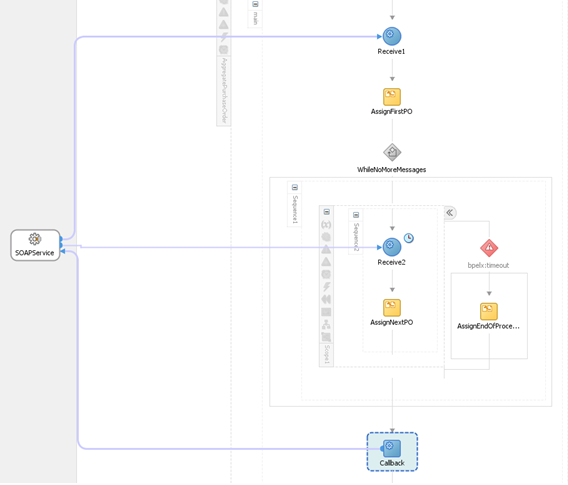
The next step in the wizard is to add activities that will be participating in the correlation. For message aggregation to work, a mid-process receive needs to be defined to receive the subsequent messages sent after the initial message.
If mid-process receive has been defined within the BPEL process, select the add icon, then choose this receive activity within the activity browser, then next, finish.
Otherwise, if it has not been defined yet, select next, and then finish. Once the mid-process receive has been defined, right click on it, select ‘Setup Correlation…’ (similar to the first step), then ‘Choose Existing Correlation Set’ to configure with the same correlation set as the initial receive:

Once in the ‘Initiate Settings’ of the wizard, be sure the value for Initiate is set to ‘no’. Continue through the wizard, selecting ‘Next’, accepting the defaults, then ‘Finish’.
Now that the correlation is configured for the receive activities, the next step is to ensure the process waits for only a given period of time to receive subsequent messages. To do this, we will need to configure a timeout value within the mid-process receive. This will tell it how long to wait for any more messages before timing out. This can be done as shown, within the Timeout tab on the activity:

Also, since we are unsure of how many messages will be received, we will stick a while loop into the process. The catch block for the timeout fault (thrown when the receive activity timer is expired) will contain an assign activity (AssignEndOfProcess in example below) that will set the value that will cause the loop to be exited.
One last configuration that is required is to add a BPEL component property. This is an important step, which will enable aggregation to function correctly (further details on this in a bit).
To set the property, in the Composite editor, select the BPEL component. Make sure the Properties tab is visible in the bottom pane in JDeveloper:

Within the Properties tab, select the add ‘plus’ icon. In the ‘Create Property’ dialog box, enter the following:
|
Name: |
bpel.config.reenableAggregationOnComplete |
|
Value: |
true |
Testing the Aggregation
When the composite is invoked multiple times, specifying the same value in each instance for the correlation value, the instances created in EM will look as shown below. Each time the composite was invoked (three times in this example), an instance is created. But notice, that only one shows as in a Running state, while the other two are already Completed:

What is happening is the instance in the Running state is receiving all the messages (aggregating them). The first message received initiates the instance, then the subsequent messages are received within the mid-process receive. Below is the trace for this test, showing exactly that:

You’ll also notice the ‘Recovered’ State. This occurred because of the timeout exception that was thrown. Since it was caught, the state is showing as recovered.
I mentioned earlier that the component property was an important step in successfully implementing aggregation via correlation. If this property is not set, the correlation will work the first time, but after that, issues will arise. I will walk you through an example of when this happened.
When the initial test was run, the correlated values given (i.e. PONum = 123) caused the process to accept and aggregate the messages (like shown above) without issue. Once the process reached the timeout threshold and shut down, the subsequent invocations to the composite with the same correlation value (i.e. PONum = 123) resulted in the message being accepted, but not processed within the composite.
The below trace provides what this scenario looks like within the EM. The instance is showing as Completed, but did not traverse through the process:

Within the soainfra.dlv_aggregation table, it becomes evident why. The second record in the screen shot below is the instance that was run prior (the initial test at 09:19:29) to when the above example (the failled test at 9:21:33). The value for the State for this record is 0 (should be 1 since the process was completed):

When the composite completed, it did not change the state to 1 (due to the BPEL property not being set). When this happened, the next time the composite was invoked with the same correlation values, a new instance was not created.
By adding the component property, bpel.config.reenableAggregationOnComplete, this corrected the issue allowing subsequent instances to correlate and process correctly.
Below is the trace for the process run after the change was made. The State within the table is set to 1 (see first row in the table above, 09:56:35). The next run of the process with the same correlation values shows a different trace within EM, one that includes processing of the message:
